
Editing Actions
Table of Contents
Actions Basics
Much of the power for Drafts resides in actions. Actions are used to export to other apps and services, to send messages and emails, and for simple things like inserting or manipulating text in the editor.
An action consists of one or more action steps, which do the work of the action, but also have basic configuration options and settings covered in this article.
To edit an action:
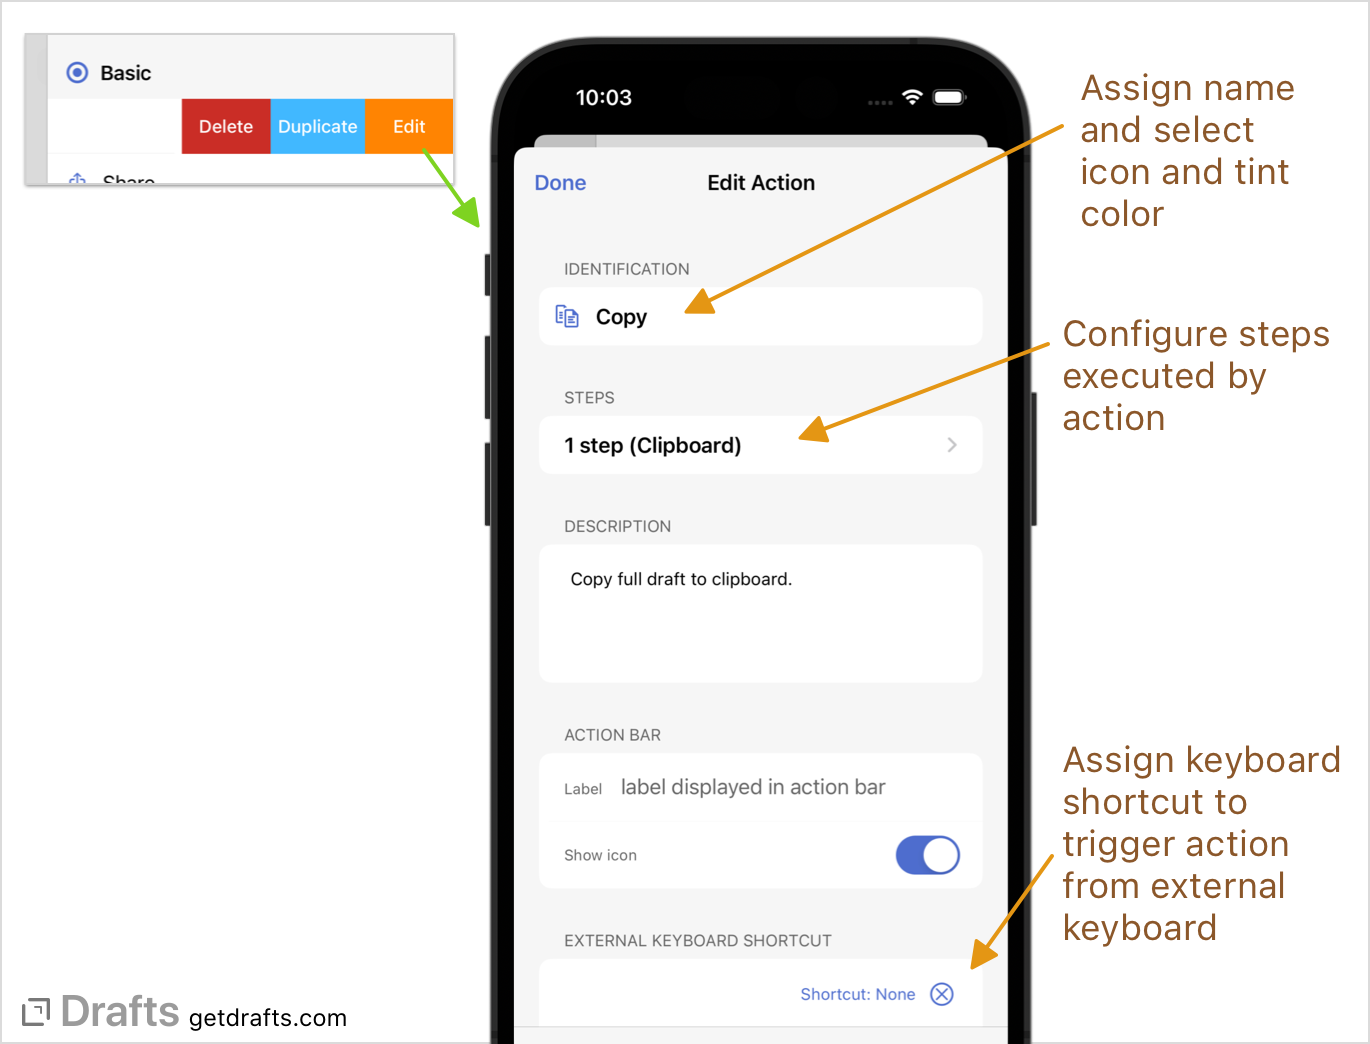
- iOS: Tap and hold on an action in the action list for options menu, select “Edit”.
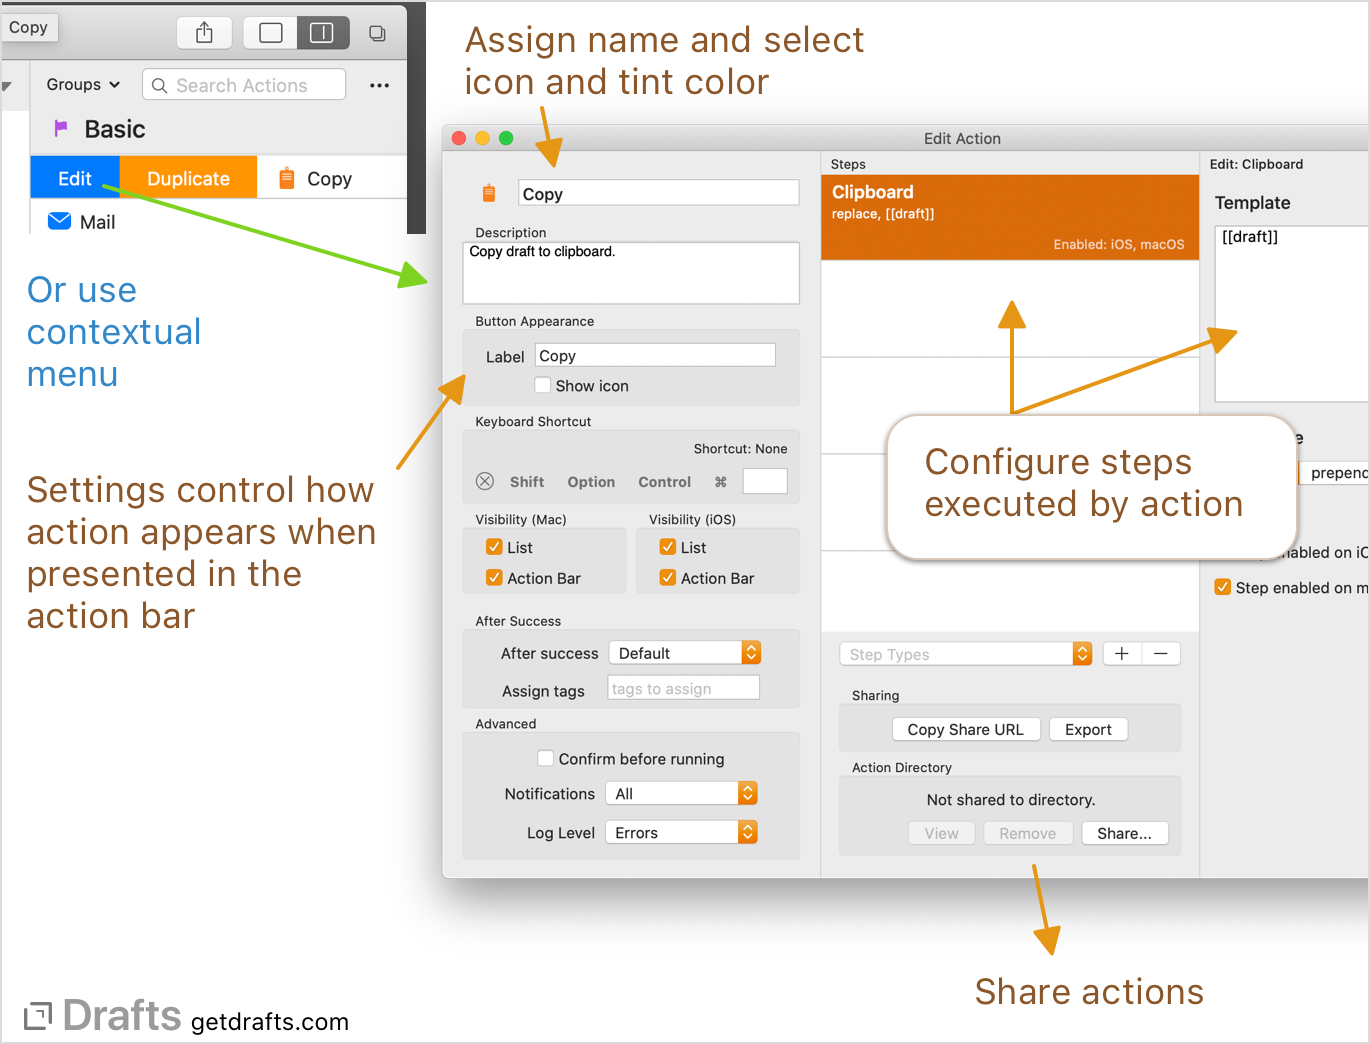
- Mac: Secondary-click on action in the action list, select “Edit”.
Settings
Icon Note
Newer versions of Drafts support the option of selecting from a set of built-in icons, but also from any of thousands of SF Symbols provided by Apple in the system. Note that Symbol icons are only available on devices running iOS 16 or greater, or macOS 13 (Ventura) or greater.
Identification
- Name: Assign a useful name to display in lists.
- Icon: Tap icon to select from thousands of icon options. Both built-in and system symbols are available.
- Tint Color: In the icon select menu, a tint color can also be assigned to help distinguish the action in the list.
Steps
- Displays the count of action steps. Tap to view and modify action steps. See action steps for more information about available steps.
- Description
- Optional description of the action. Helpful when sharing actions to help others understand how they function and any configuration that may be necessary.
Action Bar Appearance
- Key label: When the action is displayed as a key in the action bar this text is used instead of the action name. Useful for providing an abbreviated label that fits in the keyboard better.
- Show icon: If enabled, the action icon will also be displayed in the keyboard row.
External Keyboard Shortcut
Optionally assign a keyboard shortcut that can be used to trigger this action from an external keyboard attached to your device.
After Success
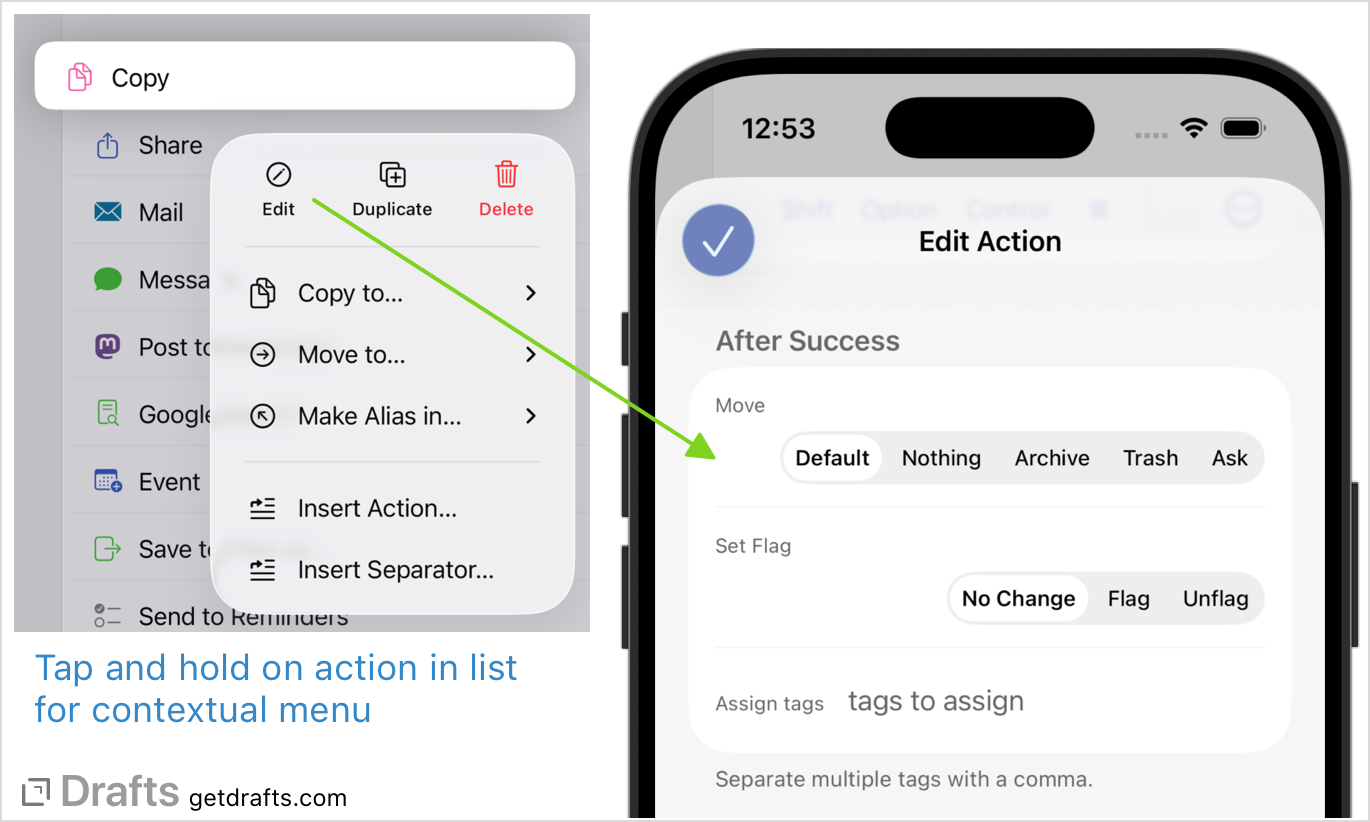
There are several configurable options that control what happens after the action successfully completes, allowing you to automatically clean up your inbox, or other files organize your draft list without additional steps. These are:
- Move: If configured, the action can automatically move the draft the action is running on to the archive, trash, or prompt for options each time.
- Assign Tags: Optionally, provide a comma-separate list of tags to assign after running the action. For example, you might have an action that posts to social media automatically assign a “posted” tag.
- Flag: Optionally, change the flagged status of the draft. Useful to automatically remove or add flags when an action is run.
Confirm before running
Drafts is geared around making it quick and frictionless to act on drafts. However, there are actions that publish text or update or overwrite files, etc., taht you might not want to accidentally trigger with an errant tap.
If “Confirm before running” is enabled, whenever the action is run, a prompt will open to confirm you wish to run the action, with the option to cancel.
Notification
The notification setting determines whether Drafts will show a banner and confirmation sounds after running the action. The options are:
- None: Do not show a banner or play notification sounds after the action. Typically used for actions (like keys that insert text) that require no confirmation.
- Errors: Only show notifications if an error occurs while running the action.
- All: Always show completion confirmation, regardless of success or failure.
Log Level
Actions generate logs of the actions execution which provide useful records of what actions have been performed on a draft, and what (if any) error occurred. Depending on the type of action, it may make sense not to log the execution of the action. For example, you might not need to know a history of each time you copied the draft to clipboard, or inserted a bold text markup with an action key. See action logs for details on accessing logs.
- None: Do not save logs of this action’s execution.
- Errors: Only log if an error occurs running the action.
- All: Always log completion confirmation, regardless of success or failure.
Action Aliases
Action aliases are actions that call other actions. Sometimes you have actions that you would like to run from multiple action groups. You could duplicate an action and place copies of it in different groups, but if you decide you want to update the functionality in the action steps, fix a bug, etc., you would need to make that update in mulitple places, which is far from ideal.
Enter action aliases, which allow you to quickly create a new action that runs the action steps of another. This can also be done manually by using the “Include Action” action step, but the “Make Alias” option streamlines this process.
To create an alias:
- Find the action you wish to alias in your action list.
- Open the contextual menu on that action:
- On iOS, tap and hold on the action
- On Mac, secondary (right) - click on it.
- Select
Make Alias in.., then the action group to place the new alias.
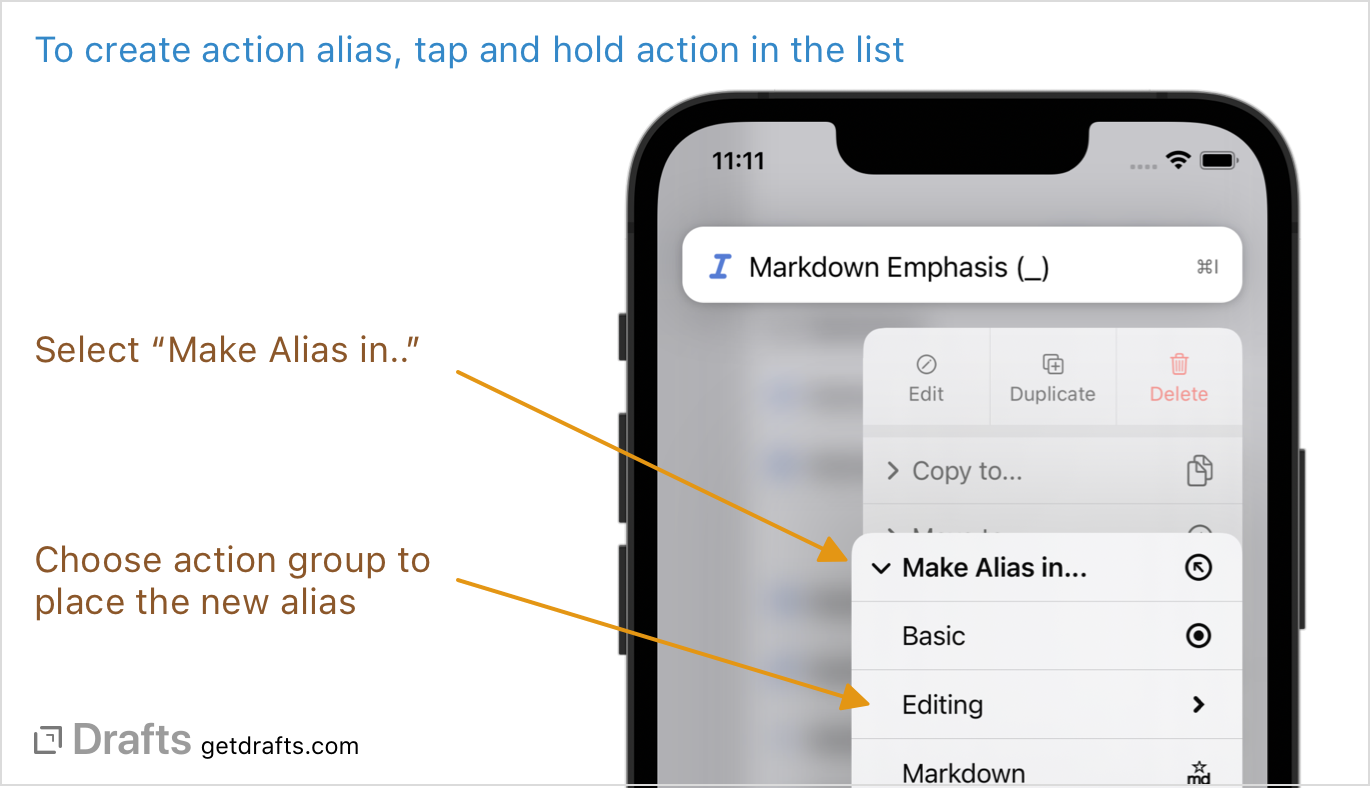
After you have created the alias, it can be moved, renamed, and other basic options changed, and the one “Include Action” step in the alias will still point to the original action and run its steps when executed.